In recent years, many gardeners have turned to composting at home as a cornerstone of sustainable living. By converting kitchen scraps and yard waste into nutrient‑rich humus, you not only reduce the volume of trash that ends up in landfills but also create a free, high‑quality soil amendment that supports healthy plants. This article explores the practical steps, common pitfalls, and environmental benefits of establishing a composting routine right in your own backyard.
The Environmental Edge of Home Composting
When organic matter is sent to a landfill, it decomposes anaerobically, producing methane—a greenhouse gas that is roughly 28 times more potent than carbon dioxide over a 100‑year period. By diverting food scraps, leaves, and grass clippings into a compost pile, you keep this methane from escaping into the atmosphere. Moreover, the resulting compost replaces commercial fertilizers, which often rely on fossil fuels and contribute to nutrient runoff. The net effect is a measurable reduction in a household’s carbon footprint, while simultaneously fostering soil biodiversity and resilience.
- Reduced landfill methane emissions
- Lower demand for synthetic fertilizers
- Improved soil structure and water retention
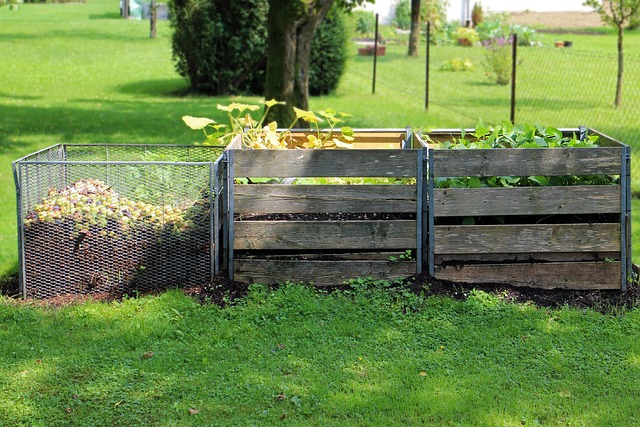
Choosing the Right Bin for Your Space
There is no one‑size‑fits‑all container for composting at home. Your choice should reflect the size of your kitchen, the amount of garden waste you produce, and whether you prefer a closed or open system. Some popular options include:
- Plastic or metal worm bins for small households
- Wooden or wire baskets that allow airflow
- Recycled plastic barrels with a lid for larger batches
Whichever bin you select, ensure it has adequate ventilation to maintain aerobic conditions, and consider a location that is protected from extreme temperatures yet accessible for daily maintenance.
Gathering the Right Materials
Successful composting hinges on a steady supply of organic matter. The best practice is to maintain a balance of “greens” (high nitrogen sources) and “browns” (high carbon sources). Greens include fruit and vegetable peels, coffee grounds, and fresh grass clippings, while browns consist of dry leaves, shredded paper, and small twigs. A practical rule of thumb is to aim for roughly 25–30 parts brown to 1 part green by volume. This ratio ensures the pile does not become too wet or too dry, both of which can stall decomposition.
Balancing Greens and Browns
Understanding the carbon to nitrogen (C:N) ratio is essential. Most green materials have a C:N of around 10:1, whereas browns are closer to 25–30:1. When you layer greens on top of browns, you create a micro‑environment where microbes thrive. If you notice your compost becoming smelly or stagnant, it’s often a sign that the balance is off—too many greens can lead to odor, while too many browns slow down the process.
Tip: Sprinkle a handful of dry newspaper on the top of each green layer to help absorb excess moisture.
Turning and Aeration: Keeping the Pile Alive
Aeration is the lifeblood of aerobic composting. Every two to three weeks, turn the pile with a pitchfork or compost aerator, especially if it has reached the height of your bin. Turning introduces fresh oxygen, which encourages beneficial microbes that break down complex organic molecules into simple nutrients. If you have a small, shallow bin, you can simply stir the contents with a long stick or a garden fork; larger piles benefit from a more thorough mechanical turning.
Moisture: The Sweet Spot
Moisture is critical—too dry, and the microbes cannot function; too wet, and the pile becomes anaerobic. Think of a damp sponge; you can squeeze out a few drops, but it shouldn’t be dripping. A simple test is to grab a handful of compost; it should feel like a wrung-out towel. If it feels spongy, add more browns; if it feels damp, sprinkle a layer of dry leaves or shredded paper to absorb excess moisture.
Temperature Matters
When composting at home, temperatures typically range between 110°F and 170°F (43°C–77°C) during the active phase. These heat levels indicate a healthy, microbial‑rich process that will break down waste quickly. To monitor temperature without expensive thermometers, look for signs such as a slight odor of damp earth and a soft, spongy texture—evidence that the pile is hot enough to kill most pathogens and weed seeds.
Common Problems and How to Fix Them
Even seasoned composters encounter issues. Below are frequent problems and practical solutions:
- Odor: Often caused by excess greens or insufficient browns. Add a layer of dry leaves or paper.
- Slow decomposition: Check if the pile is too dry or too compacted. Increase moisture or aerate more frequently.
- Weed seeds or pests: Ensure the compost reaches high enough temperatures for at least two weeks to destroy them.
- Stagnation: The pile may have become anaerobic. Turn the compost and reduce excess moisture.
When the Compost is Ready
After about 6 to 12 weeks—depending on temperature, pile size, and material—your compost will be dark, crumbly, and earthy in scent. At this stage, you can sift out any remaining large fragments and use the finished product in gardens, potting mixes, or as a mulch. A simple way to test readiness is to drop a handful of compost into a glass of water; if it dissolves within a few minutes, it’s fully composted.
Long‑Term Impact of Home Composting
By incorporating composting at home into your routine, you not only improve plant health but also build a positive feedback loop for the environment. Rich, loamy soil retains moisture, reducing irrigation needs, while the complex organic matter supports a thriving microbial ecosystem that sequesters carbon underground. Over years, the cumulative effect is a measurable reduction in household greenhouse gas emissions and a healthier local ecosystem. Moreover, sharing your compost with neighbors or community gardens extends the ecological benefits beyond your property.